If you have a single server running Forefront and not having access to your WSUS for updates (ie: an ISA server in a DMZ) you need to install the AV software with the /nomom option :
clientsetup /nomom
But it won't update automatically by itself.
You need to run Microsoft update and enable updates for Microsoft products in addition to Windows updates.
Friday, December 11, 2009
Thursday, December 10, 2009
Cannot enable "CLR enabled", needed after Forefront update (WSUS)
After a Forefront update on my server (WSUS + Forefront), it complained about an SQL option to be set (CLR) but there is no way I could set it up.
Start Forefront client security console :
An update for Microsoft forefront client security has occurred which requires the configuration wizard to be run again
Verifying settings and requirements -> failed
Log results :
[9/24/2009 9:34:49 AM] Verification(Verifying the Common Language Runtime (CLR) is enabled in SQL Server)
Common Language Runtime (CLR) is not enabled. Configuration cannot complete. For information on CLR, see http://go.microsoft.com/fwlink/?LinkId=98789
Number of verifications completed: [9/24/2009 9:34:49 AM]
I tried through the SQL Surface Area Configuration to set CLR to 1, but :
Failed to connect to server localhost\MICROSOFT##SSEE. (Microsoft.SqlServer.ConnectionInfo)
Here is how to fix it; open a command prompt and execute the following command lines :
osql -S \\.\pipe\sql\query -E -I
exec sp_configure 'show advanced options', 1
go
reconfigure
exec sp_configure
go
It shows :
clr enabled 0 1 0
Try to set clr enabled to 1...
exec sp_configure 'clr enabled','1'
go
Then :
exec sp_configure
go
It shows now :
clr enabled 0 1 1
Start again your Microsoft Forefront Client Security Console and it will go through all the update install process.
Friday, November 6, 2009
BackupExec on Linux : /opt/VRTSralus/bin/beremote daemon stops unexpectedly
When making backups of my linux server, I can have errors on open files generating errors... but the issue is that the backupexec remote agent stops running and then is unavailable for the next job.
A workaround consists in checking every hour (in this example) if the agent daemon (/opt/VRTSralus/bin/beremote) is still running, and if stopped, restart it.
Create the following script file (/root/restartRalus.sh) :
if [ -f /bin/grep ]
then
PID=`/bin/ps -e | /bin/grep beremote | /bin/sed -e 's/^ *//' -e 's/ .*//'`
else
PID=`/usr/bin/ps -e | /usr/bin/grep beremote | /usr/bin/sed -e 's/^ *//' -e 's/ .*//'`
fi
if [ "${PID}" = "" ]
then
/etc/init.d/VRTSralus.init start
fi
And execute it every hour for example :
> crontab -e
> 0 * * * * sh /root/restartRalus.sh
Thursday, November 5, 2009
VB Script to get folder and subfolders sizes with treedepth...
In order to have an automated overview of space amount used in my backup job, I made this vbs script.
Create a FolderList.txt file with pathes to folders you want to scan (don't leave blank lines)
Set the values you want for :
isProcessFiles : Get files size too
treeDepth : tree depth when scanning folders
computeAllFoldersSize : compute full size of all folders
Const isProcessFiles = 1
Const treeDepth = 3
Const computeAllFoldersSize = 1
Const ForReading = 1
Const ForWriting = 2
Const ForAppending = 8
Set objFSO = CreateObject("Scripting.FileSystemObject")
Set objLogFile = objFSO.CreateTextFile(".\FolderSizes.log")
if computeAllFoldersSize = 1 then
fullSize = 0
Set objTextFile = objFSO.OpenTextFile(".\FolderList.txt", ForReading)
Do Until objTextFile.AtEndOfStream
strFolderPath = objTextFile.Readline
Set objFolder = objFSO.GetFolder(strFolderPath)
fullSize = fullSize + objFolder.size
Loop
objLogFile.Writeline "Size of all folders in list file : " & FormatNumber(fullSize/(1024*1024*1024),3) & " GB"
objLogFile.Writeline ""
objTextFile.Close
End If
if treeDepth < 1 then wscript.quit
'For all folders specified in the text file
Set objTextFile = objFSO.OpenTextFile(".\FolderList.txt", ForReading)
Do Until objTextFile.AtEndOfStream
strFolderPath = objTextFile.Readline
Set objFolder = objFSO.GetFolder(strFolderPath)
ProcessFolder (objFolder)
Loop
Sub ProcessFolder(objCurrentFolder)
objLogFile.Writeline FormatNumber(objCurrentFolder.Size/(1024*1024),0) & " MB " & objCurrentFolder.path
if treeDepth > 1 then Call ProcessSubFolders (objCurrentFolder, 1)
End Sub
Sub ProcessSubFolders(ByRef objCurrentFolder, ByVal currentRecurseLevel)
if currentRecurseLevel >= treeDepth then exit Sub
recurseTabs = ""
For value = 0 To currentRecurseLevel - 1
recurseTabs = recurseTabs & " "
Next
if objCurrentFolder.SubFolders.count = 0 then
if isProcessFiles = 1 then
Call ProcessFiles (objCurrentFolder, currentRecurseLevel)
end if
else
Call ProcessFiles (objCurrentFolder, currentRecurseLevel)
For Each objCurrentSubFolder In objCurrentFolder.SubFolders
objLogFile.Writeline recurseTabs & FormatNumber(objCurrentSubFolder.Size/(1024*1024),0) & " MB " & objCurrentSubFolder.path
Call ProcessSubFolders (objCurrentSubFolder, currentRecurseLevel + 1)
Next
end if
End Sub
Sub ProcessFiles (ByRef objCurrentFolder, ByVal currentRecurseLevel)
if currentRecurseLevel >= treeDepth then exit Sub
recurseTabs = ""
For value = 0 To currentRecurseLevel - 1
recurseTabs = recurseTabs & " "
Next
For Each objCurrentFile In objCurrentFolder.Files
objLogFile.Writeline recurseTabs & FormatNumber(objCurrentFile.Size/(1024*1024),0) & " MB " & objCurrentFile.path
Next
End Sub
Friday, October 30, 2009
Windows Explorer very slow when browsing SharePoint Libraries
This problem has been popping up sporadically over the past number of months and I was unable to pin it to a particular client or server version. I’ve seen it in Vista and Windows 7 clients and also on MOSS 2007 with SP1 and with SP2.
When opening a SharePoint library using the Windows Explorer, the user had to wait anything between 5 and 30 seconds for a reaction – opening documents caused the same delay. It was impossible to use effectively.
I still haven’t worked out exactly how this setting is related, but changing it seems to have done the trick. Under “Internet Options”-“Connections”-“LAN settings” I disabled the checkbox “Automatically detect settings” (see below). Even though this was not effecting all users, I pushed this setting out in a GPO – so far so good.

Windows Explorer must have been looking for configuration settings every time the user clicked on a folder
Resizing Samsung hard drives to fit controller size limits
If your hard drives are too large to be managed by your controller (in my case 1.5TB HDD with an adaptec SATA RAID SA2420 card, with 1GB per HDD max.) you can resize them using using the Samsung EsTool available here. All details on the same page.
To resize your disk use the SET MAX ADDRESS feature. After resizing, you will be able to use them with size limited controllers (of course you can restore the initial size if needed).
To resize your disk use the SET MAX ADDRESS feature. After resizing, you will be able to use them with size limited controllers (of course you can restore the initial size if needed).
Wednesday, October 28, 2009
Delay SAN shutdown on power outage, avoid corrupt databases...
In my case the SAN I have will shutdown immediatly if a power outage is detected : and this cannot be changed.
My hardware : Dell EMC AX150 + APC Smart UPS 750
You cannot delay this shutdown through the NaviSphere software.
This is really annoying since the SAN hosts the Exchange databases (could have been SQL databases too).
When there is a power outage, the Exchange server doesn't have time to shutdown before the SAN turns off.... and this can cause database or logs corrupt...
In order to avoid this and since there is nothing I can parameter, I have added an intermediate UPS as shown below :

So my servers (connected to another UPS) can shutdown on a power outage (please read the shutdown scripts article) and then once the intermediate UPS battery is low (or you can parameter a delay too) it behaves like a power outage for the SAN+UPS and this one turns off too.
My hardware : Dell EMC AX150 + APC Smart UPS 750
You cannot delay this shutdown through the NaviSphere software.
This is really annoying since the SAN hosts the Exchange databases (could have been SQL databases too).
When there is a power outage, the Exchange server doesn't have time to shutdown before the SAN turns off.... and this can cause database or logs corrupt...
In order to avoid this and since there is nothing I can parameter, I have added an intermediate UPS as shown below :

SPA and SPB are the 2 power supplies of the SAN
So my servers (connected to another UPS) can shutdown on a power outage (please read the shutdown scripts article) and then once the intermediate UPS battery is low (or you can parameter a delay too) it behaves like a power outage for the SAN+UPS and this one turns off too.
Wednesday, October 21, 2009
Forefront : enable FCS client to change settings
When setting up Forefront policies you may want to let some users/computers paremeter their Forefront client on their own.
I thought that enabling the "Only administrators can change Client Security agent settings" would work as each user is in the administrator group of his machine.

This doesn't work unless you change the protection settings (virus/spyware protection) and set them to User controlled :

This will allow users to set their own schedule.
If you want to set the default scheduled scan (everyday 2AM) to another value, change it while Virus protection is set to on and before changing it to User controlled.
Monday, October 19, 2009
UPS Scripts/Procedure : Shutdown a Linux server from Windows.
When running APC PowerChute on a windows server and executing a command script on some events like we saw previously, it can be necessary to shudown a linux server too.
- On your Windows server running PowerChute, create a folder (eg. C:\ShutdownScripts) and copy in it plink and puttygen that you can download here
Puttygen will create ssh keys, and plink will execute a command on a remote machine using an ssh connection. - Run puttygen and create a pair of ssh keys (public/private) using SSH-2 DSA / 1024 in the same folder. You will generate two files, sshkey.pub and sshkey.ppk.
- Create a batch file locally (shutdownLinuxServers.bat) and add commands like :
cd C:\ShutdownScripts
@plink -T powerchute@mylinuxserver1 -i sshkey.ppk sudo /sbin/shutdown -h -P now
@plink -T powerchute@mylinuxserver2 -i sshkey.ppk sudo /sbin/shutdown -h -P now
....
This will ssh to your linux servers with the powerchute account to halt and shut them down . - On the linux server(s) side, you will need to create a user account able to shutdown the server.
- Create the powerchute account :
useradd -m -d /home/powerchute -g users -s /bin/bash powerchute - In the home folder of the user powerchute (/home/powerchute), create a subfolder .ssh (rights 700), and add it a blank file called authorized_keys (touch authorized_keys) (rights 644)
- Copy the content of your sshkey.pub in the file authorized_keys
- Append this command at the end of authorized_key, after the public key :
from=myWindowsServer,command=sudo /sbin/shutdown -h -P now ssh-dss
Where myWindowsServer is the DNS name or IP of your server running APC PowerChute.
Your file authorized_key should look like this :
ssh-dss AAAB3NzaC1kc3MAAACBAOEIj5Hm0ByaNObfUPhpboS0fONW9WqATYXjGi/wlmJipxBNo+//WooNdfeMN9bCqlbT7Z0eXfL+r4Xdmqp........svjduAB2mbQ== dsa-key-20091009 from=192.168.192.50,command=sudo /sbin/shutdown -h -P now ssh-dss - Edit the sudoers file :
> visudo - Search for this block and comment the last line :
# Defaults specification
#
# Disable "ssh hostname sudo", because it will show the password in clear.
# You have to run "ssh -t hostname sudo".
#
# Defaults requiretty <-- commented - Search for this block and add the last line :
# User privilege specification
root ALL=(ALL) ALL
powerchute ALL = NOPASSWD: /sbin/shutdown - On your Windows server, add C:\ShutdownScripts\shutdownLinuxServers.bat to your APC PowerChute script (C:\Program Files\APC\PowerChute Business Edition\agent\cmdfiles\default.cmd)
Monday, October 12, 2009
APC PowerChute script for Windows servers
When using the APC PowerChute software you can (must) run a script to shutdown your servers before battery is too low.
On the PowerChute web page, select the events you want to run a script from.
Add the default.cmd (C:\Program Files\APC\PowerChute Business Edition\agent\cmdfiles\default.cmd) command file.

The default.cmd contains after a fresh install :
@echo off
rem
rem Maximize for best viewing
rem This command file provides examples of proper command file syntax
rem
rem Command Files run by PowerChute Business Edition must be placed in this directory.
rem
rem Use the full path name of executable programs and external command files.
rem
rem The @START command must be used to run executable programs (see example below).
rem For the @START command, path names that include spaces must be enclosed in quotes;
rem arguments for the executable must be outside the quotes. A double quote must
rem precede the quoted path name. For example, to execute a command file in
rem c:\Program Files\APC\PowerChute Business Edition\agent\cmdfiles called myShut.exe,
rem the following line should be entered in the command file:
rem
rem @START "" "c:\Program Files\APC\PowerChute Business Edition\agent\cmdfiles\myShut.exe"
rem
@echo on
Add some new commands at the end like :
@START "" "C:\WINDOWS\system32\shutdown.exe" /s /f /m \\myserver.mydomain.intra /c "APC Shutdown" /d 6:12
This will shutdown your server remotely, closing all open applications and with a warning message.
You can add other commands or batch too.
IMPORTANT : the powerchute agent service may not run with sufficiant privilieges, so it cannot execute a shutdown on a remote server. Usually it uses a local account.
You need to change it to use an AD admin account :

Wednesday, October 7, 2009
Prevent domain users to add computers to domain
By default, Active Directory allows domain users to add up to 10 machines to the domain.
If you want to prevent domain users to add machines to the domain, you cannot do it by GPO, since the only policy existing "Add workstation to domain" applies to Computers Configuration and not User Configuration.
You have to run ADSI edit from the administrative tools, roll down Default Naming Context, right click on your DC=mydomain, then properties :
Find the value MS-DS-Machine-Account-Quota and change it to 0 (10 is the default value).

Monday, October 5, 2009
“Access is denied” error when crawling content with SharePoint or browsing local server
When crawling your local SharePoint site you may receive the following error message:
Access is denied. Check that the Default Content Access Account has access to this content, or add a crawl rule to crawl this content. (The item was deleted because it was either not found or the crawler was denied access to it.)
This can happen even if the account has the necessary permissions to crawl the site. This error is caused by what is know as the “loopback check”. The loopback check is basically a security “feature” which won’t allow a local IIS website to be accessed using a FQDN. This prevents an attack from pretending to be local thus bypassing certain restrictions.
Unfortunately, it also prevents your crawler from accessing local sites if they are using a FQDN.
Microsoft offers two workarounds here. You can either turn off this behaviour completely (not recommended) or you can exclude your site from this check. Here is method 2 from the above link:
- Set the DisableStrictNameChecking registry entry to 1.
- Locate and click the following key in the registry:
- On the Edit menu, click Add Value, and then add the following registry value:
Value name: DisableStrictNameChecking
Data type: REG_DWORD
Radix: Decimal
Value: 1 - In Registry Editor, locate and then click the following registry key:
-
HKEY_LOCAL_MACHINE\SYSTEM\CurrentControlSet\Control\Lsa\MSV1_0
- Right-click MSV1_0, point to New, and then click Multi-String Value.
- Type BackConnectionHostNames, and then press ENTER.
- Right-click BackConnectionHostNames, and then click Modify.
- In the Value data box, type the host name or the host names for the sites that are on the local computer, and then click OK.
- Quit Registry Editor, and then restart the IISAdmin service.
HKEY_LOCAL_MACHINE\System\CurrentControlSet\Services\LanmanServer\Parameters
Friday, October 2, 2009
Changing domain and NIS on SUN Solaris clients
- Edit /etc/defaultdomain
Set the new domain used when booting up :
mydomain.intra - Set current domain name
> domainname mydomain.intra - Add your NIS servers to /etc/hosts
- Set your client as a NIS client :
> /usr/sbin/ypinit -c
Add your NIS servers here (eg : nisserv1.mydomain.intra). - Bind your client to your NIS server :
> ypbind - Check your NIS server binding :
> ypwhich
nisserv1.mydomain.intra - Reboot
Important Be sure you did 1. ok, otherwise you won't be able to boot anymore (boot -s for single user mode, and then correct your /etc/defaultdomain file, then reboot again)
Update NIS maps, share automount files (linux)
If you need to share mounts coming from your NIS server automatically on multiple linux clients you will update the local auto.master with something like :
/net yp:auto.net
Usually auto. folder refers to a /folder. All NFS shares automounted through auto.folder, will be mounted in /folder.
For instance you create a /etc/auto.netShare on your NIS server including :
home -rw server1:/mnt/sdb2
data -rw server2:/mnt/sdc1
public -rw server3:/mnt/sdb1
In order to make available this file to clients, you need to edit the /var/yp/Makefile first.
Then you can use /netShare/home, /netShare/data, netShare/public on all clients. These folders are mounted when accessed and released after a while.
/net yp:auto.net
Usually auto.
For instance you create a /etc/auto.netShare on your NIS server including :
home -rw server1:/mnt/sdb2
data -rw server2:/mnt/sdc1
public -rw server3:/mnt/sdb1
In order to make available this file to clients, you need to edit the /var/yp/Makefile first.
Search for "AUTO_MASTER = $(YPSRCDIR)/auto.master" - Add a new line just below :
AUTO_NETSHARE = $(YPSRCDIR)/auto.netShare - Search for "all:"
Add auto.netShare to the list (passwd group hosts rpc...). By default all auto.xxx are commented out. - Search for :
auto.master: $(AUTO_MASTER) $(YPDIR)/Makefile
@echo "Updating $@..."
-@sed -e "/^#/d" -e s/#.*$$// $(AUTO_MASTER) | $(DBLOAD) \
-i $(AUTO_MASTER) -o $(YPMAPDIR)/$@ - $@
-@$(NOPUSH) || $(YPPUSH) -d $(DOMAIN) $@ - Add below the auto.master block :
auto.netShare: $(AUTO_NETSHARE) $(YPDIR)/Makefile
@echo "Updating $@..."
-@sed -e "/^#/d" -e s/#.*$$// $(AUTO_NETSHARE) | $(DBLOAD) \
-i $(AUTO_NETSHARE) -o $(YPMAPDIR)/$@ - $@
-@$(NOPUSH) || $(YPPUSH) -d $(DOMAIN) $@ - Then better do a clean up in /var/yp :
> cd /var/yp
> rm -rf ./group* ./binding/* ./hosts* mail* netid* pass* proto* rpc* services* mydomain* - Build the maps containing the new auto.netShare file
> make all
Running /var/yp/Makefile...
gmake[1]: Entering directory `/var/yp/mydomain.intra'
Updating passwd.byname...
Updating passwd.byuid...
Updating group.byname...
Updating group.bygid...
Updating hosts.byname...
Updating hosts.byaddr...
Updating rpc.byname...
Updating rpc.bynumber...
Updating services.byname...
Updating services.byservicename...
Updating netid.byname...
Updating protocols.bynumber...
Updating protocols.byname...
Updating mail.aliases...
Updating auto.netShare...
gmake[1]: Leaving directory `/var/yp/mydomain.intra' - Check your auto.netShare is part of the NIS maps :
> ypcat auto.netShare
-rw server1:/mnt/sdb2
-rw server2:/mnt/sdc1
-rw server3:/mnt/sdb1 - Now you can update /etc/auto.master on all clients with :
/netShare yp:auto.netShare - And restart automount on the clients :
> /etc/init.d/autofs restart
Then you can use /netShare/home, /netShare/data, netShare/public on all clients. These folders are mounted when accessed and released after a while.
Add a secondary NIS server (linux)
It's recommended to add a secondary NIS server to your linux network, since if the only one breaks down, users with a NIS account (all of them in most cases) won't be able to log on the linux clients anymore. Only the user root which is local will be able.
The master NIS server nisserv1.mydomain.intra runs the NIS service ypserv (/etc/init.d/ypserv)
The master NIS server nisserv1.mydomain.intra runs the NIS service ypserv (/etc/init.d/ypserv)
- Install ypserv on the secondary server nisserv2.mydomain.intra, and make it start when booting.
- On the master nis server nisserv1, add nisserv2 to the NIS servers list /var/yp/ypservers : nisserv1.mydomain.intra
nisserv2.mydomain.intra - Then build the NIS maps :
> cd /var/yp
> make all - At this point, we have to construct a list of the hosts which will run NIS
servers :
>/usr/lib64/yp/ypinit -m
nisserv12.mydomain.intra is in the list of NIS server hosts. Please continue to add the names for the other hosts, one per line. When you are done with the list, type CTRL+D : next host to add: nisserv1.mydomain.intra
next host to add: nisserv2.mydomain.intra
next host to add:
The current list of NIS servers looks like this:
nisserv1.mydomain.intra
nisserv2.mydomain.intra
Is this correct? [y/n: y] y
We need a few minutes to build the databases...
Building /var/yp/mydomain.intra/ypservers...
Running /var/yp/Makefile...
gmake[1]: Entering directory `/var/yp/mydomain.intra'
Updating passwd.byname...
Updating passwd.byuid...
Updating group.byname...
Updating group.bygid...
Updating hosts.byname...
Updating hosts.byaddr...
Updating rpc.byname...
Updating rpc.bynumber...
Updating services.byname...
Updating services.byservicename...
Updating netid.byname...
Updating protocols.bynumber...
Updating protocols.byname...
Updating mail.aliases...
Updating auto.netShare...
gmake[1]: Leaving directory `/var/yp/mydomain.intra'
nisserv1.mydomain.intra has been set up as a NIS master server. Now you can run ypinit -s nisserv1.mydomain.intra on all slave server. - Then check all maps are updated :
> ypcat passwd
> ypcat group
> ...
This will display accounts, groups... that are available through the NIS service. You can check information is the same as the one on the master NIS server (/etc/passwd, /etc/group...) - Now on the secondary server nisserv2, edit /etc/yp.conf and set nisserv2 as the NIS server to use.
domain mydomain.intra server nisserv2.mydomain.intra - Update NIS files from the master NIS server
>/usr/lib64/yp/ypinit -s nisserv1.mydomain.intra - On clients :
Edit /etc/yp.conf and set it to broadcast, so that it will be able to find another NIS if the current drops :
domain mydomain.intra broadcast - Update the NIS server to use :
> /etc/init.d/ypbind restart - Check the NIS server you use (it can still be nisserv1) :
> ypwhich
nisserv2.mydomain.intra
Tuesday, September 29, 2009
Hide your internal Exchange server name on EHLO HELO - Change your SMTP banner
I had a single Exchange server 2007 (exchange1.intra) on my internal network.
This server had the CAS, Transport and Mailbox roles installed on it.
This server used an SMTP relay to send/receive emails (public name : mail.mycompany.com).
Emails sent to some recipient servers were rejected with the following error :
This came from the fact that some recipient servers double check the name of the server sending the email with a telnet/ehlo-helo request on it :
telnet mail.mycompany.com 25
> 220 exchange1.intra Microsoft ESMTP MAIL Service .....
exchange1.intra is different from mail.mycompany.com
You can check your mail server with useful online tools line MXToolBox
Unfortunately, you cannot change your SMTP banner on your Exchange server if it has the mailbox role installed on it.
In order to change your SMTP banner, you need to :
1- add another server (echange2.intra) to your Exchange organization with the mailbox role, move all mailboxes on it and remove the mailbox role from echange1.intra.
2- remove the default Exchange header (will hide that your server is running Exchange) on
Run in the Exchange Management Shell the following command, whereis the name of your send connector:
Get-SendConnector “send connector” | Remove-ADPermission -AccessRight ExtendedRight -ExtendedRights “ms-Exch-Send-Headers-Routing” -user “NT AUTHORITY\Anonymous Logon”
Restart the Exchange Transport service.
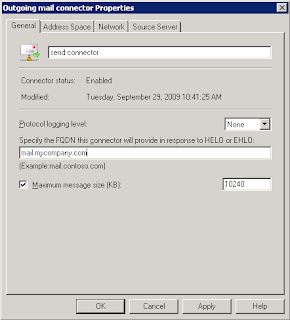
3- Set up your new banner with the name of the public server (mail.mycompany.com)
Open a command prompt on exchange1.intra :
cd C:\inetpub\AdminScripts
cscript adsutil.vbs set smtpsvc/1/connectresponse "mail.mycompany.com My Company"
4- Check on echange1.intra that in the send connector properties, you have filled the correct FQDN for helo/ehlo requests
Then the telnet feedback will be:
telnet mail.mycompany.com 25
> 220 mail.mycompany.com My Company
And your emails won't be rejected anymore.
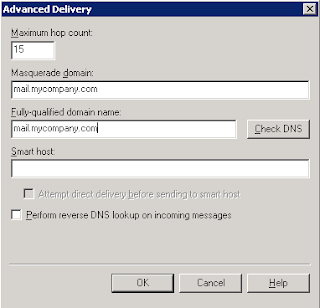
PS : if you have an SMTP virtual server (IIS), don't forget to put in the masquerade domain and FQDN fields.
This server had the CAS, Transport and Mailbox roles installed on it.
This server used an SMTP relay to send/receive emails (public name : mail.mycompany.com).
Emails sent to some recipient servers were rejected with the following error :
This came from the fact that some recipient servers double check the name of the server sending the email with a telnet/ehlo-helo request on it :
telnet mail.mycompany.com 25
> 220 exchange1.intra Microsoft ESMTP MAIL Service .....
Unfortunately, you cannot change your SMTP banner on your Exchange server if it has the mailbox role installed on it.
In order to change your SMTP banner, you need to :
1- add another server (echange2.intra
2-
Run in the Exchange Management Shell the following command, where
Get-SendConnector “send connector” | Remove-ADPermission -AccessRight ExtendedRight -ExtendedRights “ms-Exch-Send-Headers-Routing” -user “NT AUTHORITY\Anonymous Logon”
Restart the Exchange Transport service.
3- Set up your new banner with the name of the public server (mail.mycompany.com)
Open a command prompt on exchange1.intra
cd C:\inetpub\AdminScripts
cscript adsutil.vbs set smtpsvc/1/connectresponse "mail.mycompany.com My Company"
4- Check on echange1.intra that in the

Then the telnet feedback will be:
telnet mail.mycompany.com 25
> 220 mail.mycompany.com My Company
And your emails won't be rejected anymore.
PS : if you have an SMTP virtual server (IIS), don't forget to put

Monday, September 28, 2009
Certificate Errors with Exchange 2007
There is so much information about Exchange 2007 and certificate errors on the internet that it is sometimes difficult to wade through it all and find exactly what you are looking for.
I’m not going to repeat all of it here but I would like to give a quick summary of what I think solves most of the issues people are having when it comes to OWA, OAB and Autodiscover certificate errors, including the error “The name of the security certificate is invalid or does not match the name of the site”. There are obviously many ways to do this. I find this the easiest and most straight forward.
Basically, when you have a single CAS server (e.g. “server1.mydomain.local”) being accessed over IIS (for EAS, OWA, OAB etc.) using more than one URL (e.g. “owa.officialdomain.com”, autodiscover.officialdomain.com) you need a certificate which contains all of your URLs (a UC cert). To create this certificate use the Exchange Management Shell:
New-Exchangecertificate -domainname owa.officialdomain.com, autodiscover.officialdomain.com, server1.mydomain.local, server1 -Friendlyname owacert -generaterequest:$true -keysize 1024 -path c:\certrequest.txt -privatekeyexportable:$true -subjectname "DC=mydomain, DC=local, CN=server1.mydomain.local”
With this request, go to your MS CA (or some online CA) and request the certificate. Then import it using the Management Shell:
Import-Exchangecertificate -path c:\certnew.cer
The management shell will then display the thumbprint, which you will need for enabling the certificate:
Enable-exchangecertificate –services IIS –thumbprint AE8863602018F46A7E72DFA7A49D3484335EF98F
You should now have your certificate working with all URLs without the invalid name errors.
Obviously, the rest of your configuration will need to be correct, i.e. you will have to your clients trust either the certificate itself or the issuing CA.
Note:
If you have pre-Vista SP1 Windows clients (e.g. XP), Outlook will not be able to connect to the Outlook Anywhere address unless it is the CN of the cert subject
Set NTP servers on Windows Server 2008
First, check/set the following registry values :
[HKEY_LOCAL_MACHINE\SYSTEM\CurrentControlSet\Services\W32Time\Parameters]
"Type"="NTP"
[HKEY_LOCAL_MACHINE\SYSTEM\CurrentControlSet\Services\W32Time\TimeProviders\NtpServer]
"Enabled"=dword:00000001
Then, run the following commands :
w32tm /config /syncfromflags:manual /reliable:yes/manualpeerlist:time.nist.gov,tick.usno.navy.mil,tock.usno.navy.mil,0x8
w32tm /config /update
w32tm /resync
Thursday, September 24, 2009
VMWare ESXi 3.5, USB and APC UPS
It appears that ESXi doesn't support sharing USB ports among VMs, and as my APC battery is monitored through USB, I cannot have APC PowerChute running on one of my VMs.
For USB (or serial port) monitored batteries, you will need to use a physical machine. This can be understandable if you want to shut down the host too.
For USB (or serial port) monitored batteries, you will need to use a physical machine. This can be understandable if you want to shut down the host too.
Administrative Template File for Forefront (Forefront.adm)
Forefront doesn't come with any .adm file to manage it through group policies.
You can use Forefront Client Security Console to setup parameters (scan schedule, user's rights...).
When deployed using a GPO, you'll find parameters under Extra Registry Settings which is not very handy.
On the Aaron Tiensivu's Blog you will find an adm file (forefront.adm) that you can copy to your C:\Windows\inf folder of your server running Group Policy Management to have a more readable view.
Wednesday, September 23, 2009
Windows Explorer Problems with Office SharePoint Server 2007 on Windows Server 2008 R2
I was installing MOSS 2007 on Windows 2008 R2 recently and the installation went very smoothly. You basically create a slipstreamed installation source of MOSS with SP2 and run it like you would any other install – Google it – there are plenty of how-to's out there.
Everything was running fine until I tried to open a document library in Windows Explorer using “Actions”-“Open with Windows Explorer”. The browser just didn’t react, neither did Windows Explorer.
It turns out I had installed the WebDAV that comes with IIS and the WebDAV that comes with SharePoint didn’t like that one bit. Using the Server Manager I removed WebDAV from the IIS features, bounced the server and all was well.
Wednesday, September 9, 2009
Analyzing IIS Logs
I have worked with applications before which analyze web logs but the most of them required a lot more work and configuration (or costs) than I am often prepared to invest.
I was looking for a simple tool that would allow me to point to my IIS logs and say “analyze”!
After a little bit of searching and a lot of giving up on software that was either needing too much work or just poorly written/documented, I found this:
WebLog Expert Lite
It does everything I need and best of all it’s freeware!
Friday, August 28, 2009
Adding Antispam features to Exchange 2007
If you’re not using an Edge server in your Exchange 2007 environment you can still add antispam features to your server.
In the Exchange installation folder (usually C:\Program Files\Microsoft\Exchange Server\) in the subfolder “Scripts” you will find the script “install-AntispamAgents.ps1”. Open the Exchange Management Shell, switch to the Scripts folder and run the script.
You will need to restart the Exchange Transport service and then you will find an extra tab “Antispam” in the Hub-Transport settings under Organization.
Adding zen.spamhaus.org to the block list providers significantly reduced the amount of spam I was receiving.
Tuesday, June 30, 2009
Missing shares on an iSCSI volume after reboot
When a server with iSCSI volumes reboots, it is possible that the file shares will be missing. This is caused by the server service starting before the iSCSI Initiator is finished starting.
To solve the problem, add a persistant or bound volume in the iSCSI Initiator for the drive that has the missing shares.

Alternatively, you can manually restart the server service and the shares will be recreated.
Monday, June 15, 2009
SharePoint 2007 SP2 Problems
Like with most service packs, I like to run tests before installing. If the service pack is for a mission critical application such as Exchange or SharePoint I make it a point to clone my environment and run the tests on a copy of my production system.
The SP2 service packs for SharePoint 2007 came out several weeks ago so it was time to test everything. I basically recreated my domain, the web front end and the SQL DBs for my main SharePoint installation – it’s always good disaster recovery practice, in any case :). The environment was (thankfully) 100% virtual so I could work with snapshots.
I started with the WSS update which during step 8 of 9 in the configuration wizard died on me with a link to the log. In the log I found the error:
“The B2B upgrader timer job failed”
There was lots of info on Google but nothing which helped. Since it was 100% virtual I could return to the original state after every failed attempt and try something different. I tried every suggestion I could find but no amount of stopping services, removing content DBs or disabling solutions helped.
Of course, the answer ended up being a lot less complicated than I had thought. I had an old web application which I had used for testing something a long time ago and, naturally, I hadn’t reproduced the content DBs when I was building my test environment. I deleted the old web application, retried the update and it ran like a dream.
Happy days!
Thursday, May 14, 2009
Changing the name of a SQL Server
After changing the computer name on a MS SQL Server you will need to run the following SQL query:
sp_dropserver <old_name>
GO
sp_addserver <new_name>, local
GO
Wednesday, May 6, 2009
Microsoft Virtualization
I’ve finally had the chance to play around with Windows Virtual PC and XP Mode. I must say, although it’s good to finally have an update to Virtual PC 2007, I can’t understand why Microsoft still refuses to implement certain functionality.
Windows Server 2008 R2 is only available in 64 bit, which is more than OK, but why the hell won’t Windows Virtual PC support 64bit guest systems?? You have the technology in Hyper-V, Microsoft, it’s not rocket science - why would you do this? All I want is the ability to boot a Hyper-V system on my desktop/laptop. One would think that, overall, it would be MORE work for Microsoft to have their server and client virtualization differ so much. I suppose I am stuck with VMWare Server on my laptop for another while.
On the other hand, I do like what I have seen so far in XP Mode. It’s basically a virtual XP machine which publishes its applications using RDP (any links to applications in the All Users start menu pop up in the Windows 7 start menu) – pretty neat. I can see it causing problems, though, when several applications need to be used simultaneously – XP only supports 1 RDP connection. It will be interesting to see if Microsoft makes any changes to that before the RTM.
Thursday, April 23, 2009
Using the Active Directory Recycle Bin in Windows 2008 R2: Part 2
To view the Deleted Objects container you will need to use ldp.exe
1. In the Options menu click Controls
2. In the Load predefined menu select Return deleted objects and click OK
3. Under Connections choose Connect and then Bind
4. Under View choose Tree and enter your domain
5. You should now find the container in the displayed tree.
You can use ldp to restore items but I find it easier to use PowerShell
Basically, to restore the user “Dave” use the following command:
Get-ADObject -Filter {displayName -eq "Dave"} -IncludeDeletedObjects | restore-ADObject
….wait a short while and the user should pop up again.
For more details see here
Wednesday, April 22, 2009
Using the Active Directory Recycle Bin in Windows 2008 R2: Part 1
The new recycle bin option in Windows 2008 R2 is a godsend for any admin who might accidentally delete an AD object by mistake. For some strange reason it’s not turned on by default and there are a number of steps needed to get it going.
Technet details most of it quite well but I thought I would create a quick and dirty guide for those of you just want to skip to the “good parts” ;)
1. Start a PowerShell console and type “import-module ActiveDirectory”
2. Raise the forest functional level to W2008R2 using PowerShell:
Set-ADForestMode –Identity domain.com -ForestMode Windows2008R2Forest
3. Enable the Recycling Bin using:
Enable-ADOptionalFeature –Identity ‘CN=Recycle Bin Feature,CN=Optional Features,CN=Directory Service,CN=Windows NT,CN=Services,CN=Configuration, DC=domain,DC=com’ –Scope Forest –Target ‘domain.com’
….that was the easy part.
In Part 2 I will explain how to actually view the deleted objects and restore them.
Wednesday, April 1, 2009
Forefront “Exceedingly compressed size” error
When uploading a compressed file to SharePoint or sending it via email (Exchange), users were getting the error “Exceedingly compressed size”.
It seems that Forefront will block any compressed file that has a file larger than 20MB. Unfortunately, this setting can only be changed in the registry. I found the following newsgroup entry on the subject:
The Exceedingly compressed size can be controlled by a registry key called MaxCompressedArchivedFileSize.
If any one object within the zip file has a COMPRESSED size of over the MaxCompressedArchivedFileSize (which is a default of approx
20MB) then Forefront will delete this file. The reason this was done was to prevent a denial of service attack where Antigen would be scanning an infinitely large file. The incident that you will see for this would be an "Exceedingly compressed size virus”.
If this is the reason why a message is getting caught you can do the following:
- In the registry go to HKEY_LOCAL_MACHINE\SOFTWARE\Wow6432Node\Microsoft\Forefront Server Security\SharePoint or (Exchange) Server
- Add a DWORD Key of: MaxCompressedArchivedFileSize (equaling 40,000,000)
- Restart FSCController service
This is about 40 MB. This will allow the zip file itself to be about 40 MB before Forefront will take action on it.
Thursday, March 5, 2009
Installing Windows 7 from a USB Drive
Prepare the USB drive as follows
1. Diskpart
2. List Disk
3. Select Disk 1 (Replace 1 with number reflecting your USB Drive)
4. clean
5. create partition primary
6. active
7. format fs=fat32 quick
8. assign
Now, a drive letter reflecting the drive should appear. Copy the bits from the DVD to the USB Stick.
If you get errors along the way, simply remove the drive and repeat the process.
Boot from the drive and install normally :)
Wednesday, January 28, 2009
Uploading larger files to SharePoint (part 2)
After making the changes explained here I was able to upload larger files due to the IIS connection timing out. However, I ran into a similar problem a few days ago when trying to upload a 30 MB file to a Document Library and the previous solution didn’t seem to help.
My research eventually brought me to this Knowledge Base article. It seems that IIS 7 on Windows Server 2008 has a file size limit of 28 MB.
I’m sure Microsoft had a really good reason for adding these limits to their newest web server but I have been unable to find one. Would it be too much to ask for the SharePoint configuration tools to make these changes when it is creating the new site in the first place?
So I added the following to the web.config file in the virtual server folder and all was well:
<system.webServer>
<security>
<requestFiltering>
<requestLimits maxAllowedContentLength="52428800"/>
</requestFiltering>
</security>
</system.webServer>
I had to add it to the end of the file (just before the </configuration> tag). Adding it to the beginning of the file caused an “Internal Server Error”.
Sunday, January 25, 2009
Error copying large files over the network
When backing up my Hyper-V VMs over the network. I was getting the following error message with one file that was 60GB in size:
Not enough server storage is available to process this command.
A quick Google search found several references, a number of which pointed to this. The current value on my (Windows Server 2003) file server was 18. After upping this to 21 and rebooting the server, the error disappeared and I could successfully copy my 60GB file over the network.
UPDATE:
After running into this again with other files I had to increase to 24.
Thursday, January 22, 2009
Taking ownership of a SharePoint site
The farm admins no longer automatically have access to all SharePoint sites. If you don't have access you can take ownership or take a role of "Secondary site administrator" by using this command:
stsadm -o siteowner -url http://sharepoint.test.com/sites/[sitename] -ownerlogin [DOMAIN\netID]
use the
-secondarylogin switch to take ownership of the “Secondary site administrator” role.Problems uploading larger files to SharePoint
Clients were getting an "unknown error" message when trying to upload larger files (> 10MB) remotely. It seems that IIS was timing out after a couple of minutes.
Making the changes to web.config detailed here solved the problem
Changing the license key in MS office
Sometimes it is necessary to change the license key in MS Office. For example, I recently installed Office on a Terminal Server and because you need a VL Key Office complained about not having the right key, refused to start but of course didn’t give me the option to change it.
How to force Office to ask for a new key is explained here:
Basically you need to delete the registry keys DigitalProductID and ProductID
Which can be found under
HKEY_LOCAL_MACHINE\SOFTWARE\Wow6432Node\Microsoft\Office\12.0\Registration
or
HKEY_LOCAL_MACHINE \Software\Microsoft\Office\12.0\Registration
Manually starting a crawl in WSS
In MOSS it is possible to manually start a crawl by going to the settings of the content source in the SSP and choosing a full or incremental crawl in the drop down menu.
There is no equivalent in WSS when using the GUI. To start a crawl in WSS run the following command:
Stsadm -o spsearch -action fullcrawlstart
Backing up Hyper-V using Powershell
I needed a simple and inexpensive way to backup my Hyper-V VMs. Like with most scripting tasks, I usually search online for examples and suggestions before attempting something myself. I soon discovered this:
http://mindre.net/post/Powershell-script-for-snapshot-and-exporting(backup)-Virtual-Machines.aspx
As with most scripts I needed to adjust it to my needs. Firstly, my host does not have enough space to keep a copy of all my VMs so I needed a script that would export one VM at a time to a network share. Of course, the export function in Hyper-V doesn’t support the use of network drives or UNC paths so I had to export locally first and then copy to the backup share on the file server. I also didn’t need to export all the VMs so I decided to add the VMs manually.
Before even starting I had to ensure that the scripts would work. For this you need two things. You need to install the “Windows PowerShell” feature in Windows Server 2008 and you need to adjust the script signing policy. For testing purposes you can use “Set-ExecutionPolicy Unrestricted” to disable the signing requirement.
I split the task into two scripts backup.ps1 and function.ps1. backup.ps1 simply sets the variable $guest to the name of the first VM and then calls function.ps1 to do the actual backing up. It then sets $guest to the second VM and calls function.ps1 again to back it up and so on.
Because I don’t have very much disk space I had the script delete the local files after copying them to the server. I only then started backing up the next VM.
The contents of the scripts can be found below.
The next steps are to schedule the scripts to run automatically and to create a log file and email it (to me for example).
backup.ps1
$script_dir = "d:\backup\scripts"
$guest = "db1"
. "$script_dir\function.ps1"$guest = "name-of-VM-to-backup"
. "$script_dir\function.ps1"
function.ps1
##
## Create a backup of the VM defined in the variable $guest
##$dest = "d:\backup"
$dest_server = "\\fileservername\Hyper-V-Backup"
$VM_Service = get-wmiobject -namespace root\virtualization Msvm_VirtualSystemManagementService$VM = gwmi -namespace root\virtualization -query "select * from msvm_computersystem where elementname='$guest'"
$VMReturnState = $VM.EnabledState
$VMName = $VM.ElementNameif (($VM.EnabledState -eq 2) -or ($VM.EnabledState -eq 32768) -or ($VM.EnabledState -eq 32770))
{
$VM.RequestStateChange(32769)
echo "Saving the state of $VMName"
}while (!($VM.EnabledState -eq 32769) -and !($VM.EnabledState -eq 3))
{
Start-Sleep(1)
$VM = get-wmiobject -namespace root\virtualization -Query "Select * From Msvm_ComputerSystem Where ElementName='$VMName'"
}if ([IO.Directory]::Exists("$dest\TmpDir\$VMName"))
{
[IO.Directory]::Delete("$dest\TmpDir\$VMName", $True)
}echo "Exporting the VM"
$status = $VM_Service.ExportVirtualSystem($VM.__PATH, $True, "$dest\TmpDir")
if ($status.ReturnValue -eq 4096)
{
$job = [Wmi]$status.Job
while (!($job.PercentComplete -eq 100) -and ($job.ErrorCode -eq 0))
{
Start-Sleep(5)
$job = [Wmi]$status.Job
echo $job.PercentComplete
}
}## Store the files on in a temp directory before moving them to their location and then remove the old files.
if ([IO.Directory]::Exists("$dest_server\$VMName"))
{
[IO.Directory]::Move("$dest_server\$VMName", "$dest_server\$VMName-OldTmpDir")Copy-Item "$dest\TmpDir\$VMName" "$dest_server\$VMName" -recurse
[IO.Directory]::Delete("$dest_server\$VMName-OldTmpDir", $True)
[IO.Directory]::Delete("$dest\TmpDir\$VMName", $True)
}
else
{
Copy-Item "$dest\TmpDir\$VMName" "$dest_server\$VMName" -recurse
[IO.Directory]::Delete("$dest\TmpDir\$VMName", $True)
}
echo "Done with $VMName"
$VM.RequestStateChange($VMReturnState)
UPDATE 19.08.2009
If you like you can change the last part of the script by moving the last command ($VM.RequestStateChange($VMReturnState))to directly after the export (i.e. before the last “if”). This way the VM will have a lot less down time since it won’t need to wait for the files to be copied over the network.
Subscribe to:
Posts (Atom)